Configuring Archive Servers
The Archive Servers allows you to configure up to three archive destinations. The first destination should always be a Local server for local media. The remaining two destinations are Network servers, which can be configured using File transfer protocol (FTP) File Transfer Protocol (FTP) - A protocol for transferring files between a client and a server over a network. or Secure File transfer protocol (SFTP) Secure File Transfer Protocol (SFTP) - A file transfer protocol built on SSH (Secure Shell). (recommended).
-
From the EPM User Interface screen, select Options
 - Settings and Users - Settings: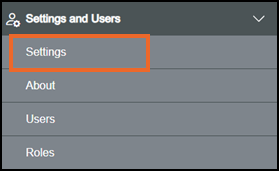
-
The Settings screen displays, select Archive Servers which then displays on the right-hand side of the screen:
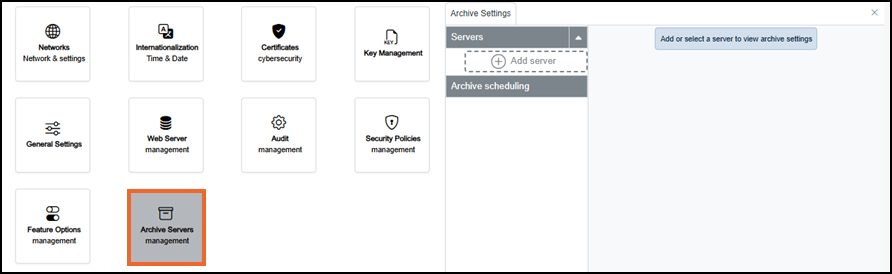
-
Select Add server
 to add a new server.Note - Once a server is added it cannot be deleted, although it can be disabled. You can add up to three archive servers.
Select from the following options to expand the details:
Local Sever
A Local Server uses a storage device attached to the EPM device USB port and stores archive files in the specified media destination:
-
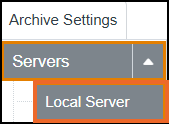
From the left-hand side of the Archive Settings screen, select Servers - Local Server:
-
If you are not already in Configuration lock, the Configuration lock screen displays
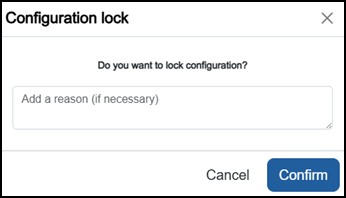
Enter a reason if required and then select Confirm
 . The system configuration is now locked pending the submission of your update and the Configuration Locked
  icon displays on the status bar.Note - Configuration lock does not affect the operation of the EPM device.See Configuration Lock for details.
 -
Complete as appropriate:
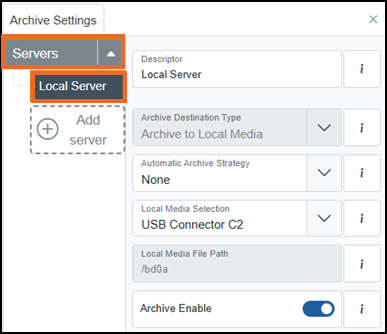
-
Descriptor - Defaults to 'Local Server'. Enter a unique name for this server to identify it if required.
Note - Archive descriptor fields cannot contain consecutive spaces. -
Archive Destination Type - Defaults to local media, for a Local Server. This option cannot be updated.
-
Automatic Archive Strategy - Defines whether this Local Server archives automatically and if so, how often it runs. Select from the available list. Defaults to None:
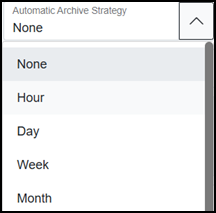 Tip - When None is selected, scheduled archiving is disabled for the archive server. No hourly, daily, weekly, or monthly archives will run automatically. Manual archiving remains available when Archive Enable is On.
 -
Local Media Selection - Defaults to USB-C port used for archiving.
-
Local Media File Path - Specifies the destination folder or path on the local media for archiving. This option cannot be updated.
-
Archive Enable - Enables or disables this local server for archiving. Disable to stop the local server from performing an archive.
-
Network Server
A Network Server transfers archive files from your device to a network location, using either FTP or SFTP, with the required connection details such as host, login, and file format:
-
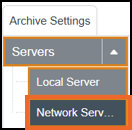
From the left-hand side of the Archive Settings screen, select Servers - Network Server:
-
If you are not already in Configuration lock, the Configuration lock screen displays
Enter a reason if required and then select Confirm
. The system configuration is now locked pending the submission of your update and the Configuration Locked icon displays on the status bar.Note - Configuration lock does not affect the operation of the EPM device.See Configuration Lock for details. -
Complete as appropriate:
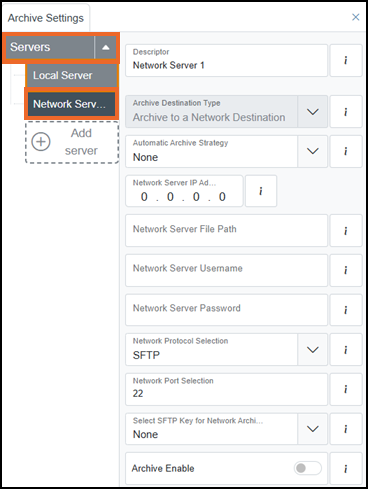
- Descriptor - Defaults to 'Network Server 1'. Enter a unique name for this server to identify it if required.
-
Archive Destination Type - Defaults to Network Destination. This option cannot be updated.
-
Automatic Archive Strategy - Defines whether this Network Server archives automatically and, if enabled, how often it runs. Select from the available list.
Tip - When None is selected, scheduled archiving is disabled for the archive server. No hourly, daily, weekly, or monthly archives will run automatically. Manual archiving remains available when Archive Enable is On. -
Network Server IP Address - Add the IP address or the DHCP of the destination server to archive to.
-
Network Server File Path - Add the valid path to the archive directory for each configured host.
-
Network Server Username - Add the login name to authenticate the network server to the remote FTP or SFTP server.
-
Network Server Password - Add the password for the Network Server Username account.
Note - The password does not display on the screen for security purposes. -
Network Protocol Selection - Add the protocol the server uses to connect to the destination from the available list.
Note - FTP does not encrypt login credentials or transferred data, making it vulnerable to interception and other cyber attacks. We recommend you use SFTP where supported. -
Network Port Selection - Add the TCP port number for the remote connection, this defaults to 22.
-
SFTP Key for Network Archiving - Add the key from the device’s Key Management, by its descriptor, it uses this to establish a secure SFTP connection to your remote server. See Configuring Key Management for further details.
Note - Archive descriptor fields cannot contain consecutive spaces.
-
-
Once complete, select Review pending changes
 screen to review updates to the configuration, and submit them. See Reviewing and Submitting Changes for details if required.Note - Reviewing and submitting can be completed in bulk once you have completed all your additions and/or updates.
Last update - August 2026