Configuring an Alarm
Process Alarms indicate process disturbances, they are user defined and designed to notify users of specified abnormal conditions. Alarms are usually configured when a data source is defined, but they can be set up at any time.
To add an alarm to your process variables:
-
From the EPM User Interface screen, select Options
 - Device I/O or Functions: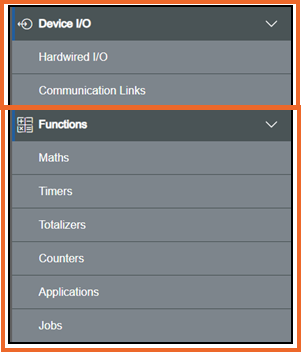
-
Select the type of process variable or function you want to configure an alarm for from the available options.
-
Regardless of the type of process variable, select the source required and then for:
-
Hardwired I/O:
-
Select the I/O module required and Channels and Modules tabs display in the in the right-hand side pane. From Channels, select the channel required.
See I/O Channels for details on setting up a Hardwired I/O.
-
-
Maths:
-
Select the Math channel required from the existing list and the math settings displays in the right-hand side pane.
-
-
Timers:
-
Select the Timers channel required from the existing list and the timer settings displays in the right-hand side pane.
-
-
Totalizers:
-
Select the Totalizer channel required from the existing list and the totalizer settings displays in the right-hand side pane.
-
-
Counters:
-
Select the Counters channel required from the existing list and the counter settings displays in the right-hand side pane.
-
-
Applications:
-
Select the Applications channel required from the existing list and the application settings displays in the right-hand side pane.
-
-
Regardless of the type of channel selected, either:
-
From under each channel in the left-hand pane, or
-
From the bottom of the right-hand pane:
Select Add Alarm
 .
.
Tip - You can select Add Alarm multiple times until you have the number of alarms required, up to a maximum of eight, and then configure them, or you can select Add Alarm, configure it and then repeat until all the alarms required for this channel are configured. -
-
-
If you are not already in Configuration lock, the Configuration lock screen displays
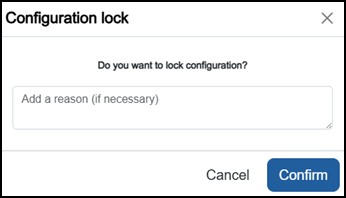
Enter a reason if required and then select Confirm
 . The system configuration is now locked pending the submission of your update and the Configuration Locked
  icon displays on the status bar.Note - Configuration lock does not affect the operation of the EPM device.See Configuration Lock for details.
 -
The alarm displays under the selected channel on the left-hand pane, select to configure.
Note - A new alarm defaults to High. -
Depending on what the alarm is being attached to, one of the following displays:
-
Alarm Configuration - Available from Functions, for example, Maths and Totalizers and hardwired I/O:
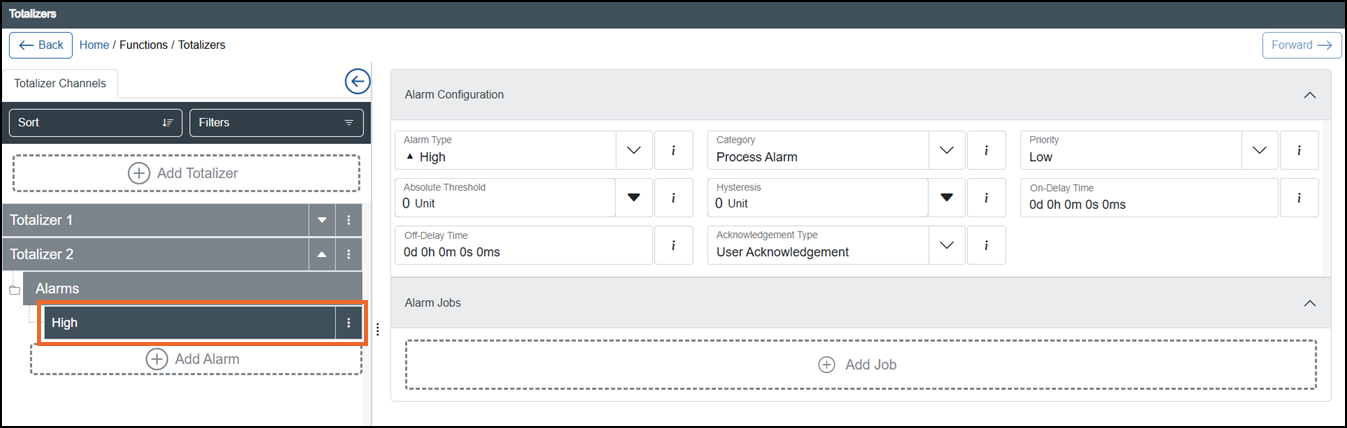
-
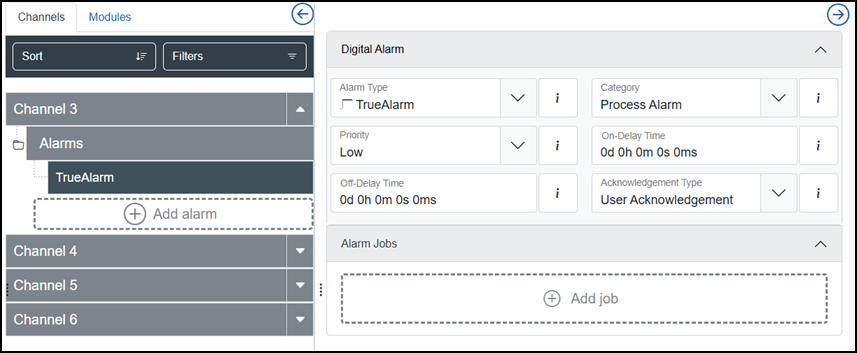
Digital Alarm - Available from Device I/O - Hardwired I/Owith a digital I/O selected, and Maths function Digital Value (Latched):
-
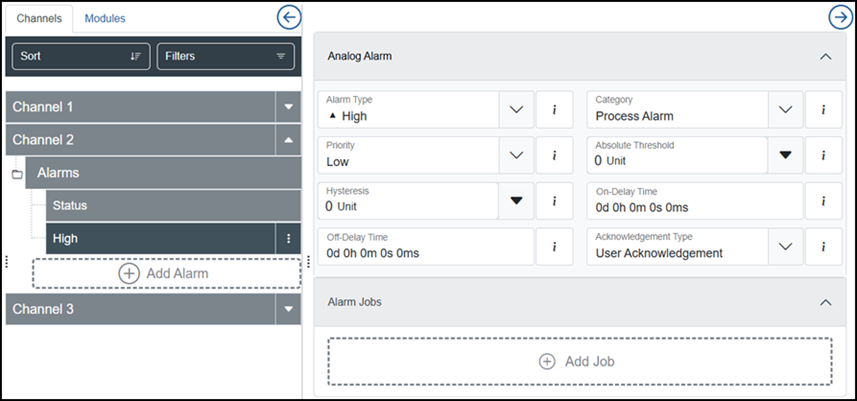
Analog Alarm - Available from Device I/O - Hardwired I/O with an analog I/O selected:
Complete as required:
Tip - Select Information to display on-screen tooltips.
-
Alarm Type - Defaults to High, select the type of alarm to configure.
Select from the following options to expand the details:
 DevBandIn (Deviation Band In)
The alarm becomes active whenever the signal value enters the specified range Deviation Reference ±(Deviation Threshold+ Hysteresis). Additional details must be defined:
-
Deviation Reference (Unit)- Enter a a numeric constant to define the center point of the acceptable range.
-
Deviation Threshold (Unit) - Enter the acceptable deviation value either side of the Deviation Reference creating the band range.
DevBandOut (Deviation Band Out)
The alarm becomes active whenever the signal value leaves the specified range Deviation Reference ±(Deviation Threshold+ Hysteresis). Additional details must be defined:
-
Deviation Reference (Unit)- Enter a numeric constant, this should be the center of your acceptable range.
-
Deviation Threshold (Unit) - Enter the acceptable deviation value either side of the Deviation Reference creating the band range.
Deviation High
The alarm becomes active whenever the signal value is above the Deviation Reference + (Deviation Threshold+ Hysteresis). Additional details must be defined:
-
Deviation Reference (Unit)- Enter a numeric constant, this should the ideal value.
-
Deviation Threshold (Unit) - Enter the acceptable deviation value above the Deviation Reference.
Deviation Low
The alarm becomes active whenever the signal value is below the Deviation Reference - (Deviation Threshold+ Hysteresis). Additional details must be defined:
-
Deviation Reference (Unit)- Enter a numeric constant, this should the ideal value.
-
Deviation Threshold (Unit) - Enter the acceptable deviation value below the Deviation Reference.
Falling Rate
The alarm becomes active whenever the signal value changes by more than the specified Rate. A first order filter
A first order filter, also known as a low pass filter, is typically used to help remove 'noise' (not just electrical) from a process signal and smooth the value. time can be set to remove the effects of sudden, but short-lived changes, for example, noise spikes on the signal. Additional details must be defined:-
Rate Threshold - Enter the maximum rate of change acceptable.
-
Rate Time Unit - Select the time unit to apply to the above threshold.
-
Rate Filter Time - Enter a first order filter time frame to apply to the above change rate in order to reduce the incidence of nuisance alarms in the event of spikes in process values arising from noise.
Note - Ensure the time constant of the filter is large enough to remove the undesired noise but small enough not to suppress real underlying dynamic behavior of the process signal.Tip - It is best practice to address 'noise' at the source wherever possible, for example, by considering the type and position of the measurement sensor.
High
The alarm becomes active whenever the signal value exceeds the Absolute Threshold. Additional details must be defined:
-
Absolute Threshold- Either enter a numeric constant.
High High
The alarm becomes active whenever the signal value exceeds the Absolute Threshold. Additional details must be defined:
-
Absolute Threshold- Either enter a numeric constant.
Low
The alarm becomes active whenever the signal value drops below the Absolute Threshold. Additional details must be defined:
-
Absolute Threshold- Either enter a numeric constant.
Low Low
The alarm becomes active whenever the signal value drops below the Absolute Threshold. Additional details must be defined:
-
Absolute Threshold- Either enter a numeric constant.
Rising Rate
The alarm becomes active whenever the signal value changes by less than the specified Rate. A first order filter
A first order filter, also known as a low pass filter, is typically used to help remove 'noise' (not just electrical) from a process signal and smooth the value. time can be set to remove the effects of sudden, but short-lived changes, for example, noise spikes on the signal. Additional details must be defined:-
Rate Threshold - Enter the maximum rate of change acceptable.
-
Rate Time Unit - Select the time unit to apply to the above threshold.
-
Rate Filter Time - Enter a first order filter time frame to apply to the above change rate in order to reduce the incidence of nuisance alarms in the event of spikes in process values arising from noise.
Note - Ensure the time constant of the filter is large enough to remove the undesired noise but small enough not to suppress real underlying dynamic behavior of the process signal.Tip - It is best practice to address 'noise' at the source wherever possible, for example, by considering the type and position of the measurement sensor.
-
-
Category:
-
System Alarm - Default for Physical I/O - Status, select Process Alarm to change this to a Process alarm if required.
-
Process Alarm - Default for all other types of Alarm, select System Alarm to change this to a System alarm if required.
-
-
Priority - Defaults to Low, select from Low, Medium or High as appropriate. This defines how the alarm displays on the Group card, Alarm Summary screen and the Status Bar:
-
 /
/ Low priority
 -
 /
/ Medium priority
 -
 /
/ High priority
-
-
Absolute Threshold- Set the threshold required for this alarm. Depending on the channel you are configuring the alarm for, this could be:
-
Time picker - Use the up and down arrows, enter number of days in d, hours in h, minutes in m, seconds in s and milliseconds in ms. Select Apply
 to save.
 -
Another Channel - Select Expand
 and tick the channel required from the channels available.
-
-
Hysteresis - This eliminates fluctuating triggers if, for example, the signal value is hovering around the trigger point. The value relates to:
-
Below the Absolute Threshold for High and High High alarms.
-
Above the Absolute Threshold for Low and Low Low alarms.
-
Outside the deviation band for Deviation Band In alarms.
-
Inside the deviation band for Deviation Band Out alarms.
-
-
On Delay Time (previously known as Dwell) - Set to configure a delay between the transition of the signal value into alarm condition and the activation of the alarm. Use the up and down arrows, enter number of days in d, hours in h, minutes in m, seconds in s and milliseconds in ms. Select Apply
to save. -
Off Delay Time (previously known as Dwell) - Set to configure a delay between the transition of the signal value into normal condition and the inactivation of the alarm.Use the up and downarrows, enter number of days ind, hours in h, minutes in m, seconds in s and milliseconds in ms. Select Apply
to save: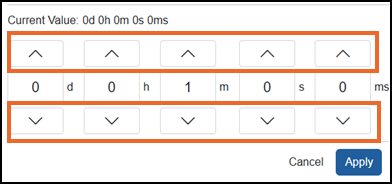
-
Acknowledgment Type - Defaults to User Acknowledgement to ensure this alarm can only be acknowledged by a user. Update to Self Acknowledgement to set this alarm to automatically clear if the signal value no longer meets the triggering condition.
-
-
Repeat steps 3 to 6 if you require more than one alarm.
-
If a Job should be triggered from this alarm, select Add Job
 and complete as required, see Configuring Jobs for details.
 -
If the Job defined should trigger an Action, select Add Action
 and complete as required, see Configuring Actions for details.
 -
Once complete, select Review pending changes
 screen to review updates to the configuration, and submit them. See Reviewing and Submitting Changes for details if required.Note - Reviewing and submitting can be completed in bulk once you have completed all your additions and/or updates.
Last update - May 2026